Understanding the concepts behind asynchronous messaging
Understanding the concepts behind asynchronous messaging
This is the sixth article in the series about the various block editors for Umbraco.

The Bento Editor is a layout building block editor from Koben Digital. Bento is heavily inspired by the best parts of the original Umbraco Grid Editor with the DTGE and can be a great alternative to the Grid Layout. Bento works in two ways - the Bento Stack which helps you build stacked blocks like a Bento box from which it gets the name and the Bento Reusable Library where you maintain reusable content and insert that into the pages.
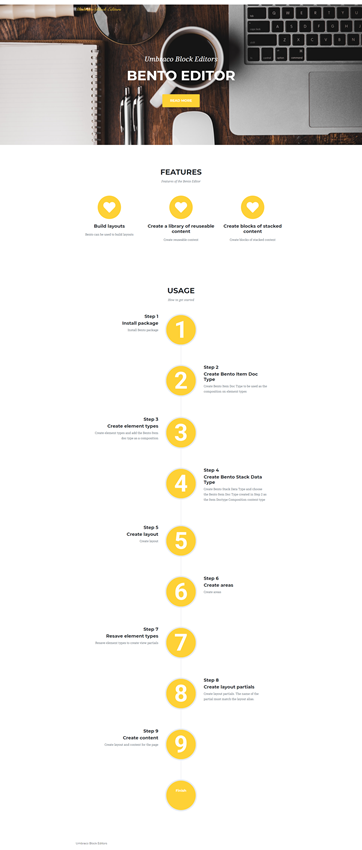
In this article am going to build a page that looks as shown below and I will be explaining the configuration and code to build the Hero component. Code for the entire page is available in my repo.

Bento can be installed as a Nuget package.
Install-Package Bento.EditorMy Hero element type looks as shown below. To demo Bento Stack and Bento Reusable Library for the block I have set up a composition called Bento Hero Composition. Bento Stack uses Single Use Items. They are element types that help insert content directly into the page. With Bento Reuseable Library the content resides in the content tree inside a "Bento Library". These content items are regular Umbraco document types. I have created a Bento Hero (alias :bentoHero) element type to use as Single Use Item and a Bento Hero Library Item (alias: bentoHeroLibraryItem) document type as my Bento Reusable Library Item. Both the items are composed of my Bento Hero Composition.

Bento uses document types to identify the Single Use Items and Reusable Library Items. The first step is to set up a Bento Item Composition. This is an element type used as a composition on all Single Use and Reusable Library Items. In my example, it is called Bento Item Composition. This document type does not need any properties, but if you have properties common to all your Bento items it can go in this document type. So I add this document type as a composition to both my Bento Hero and Bento Hero Library Item types which I set up above. The Bento Item Composition is the most important aspect of the Bento Editor. It is the glue that helps Bento identify its parts. This is a mandatory configuration that is required.
The next items to set up are the Bento Library Document Type and the Bento Item Type Folder Document Types. These are needed only if you plan to use the Bento Reusable Library. Both are document types without a template. In my example, I have called them Bento Library and Bento Item Type Folder for the sake of simplicity. I have also allowed Bento Item Type Folder as a child to Bento Library. The reusable library items are content that resides in the content tree. The Bento Library is the root type for the library so I have allowed it at the root of the content. The Bento Item Type Folder is used to organise the content of each of the Bento Library Item Types into folders. I have allowed my Bento Hero Library Item as a child of my Bento Item Type Folder. This helps me directly create reusable pieces of content in the tree if needed.
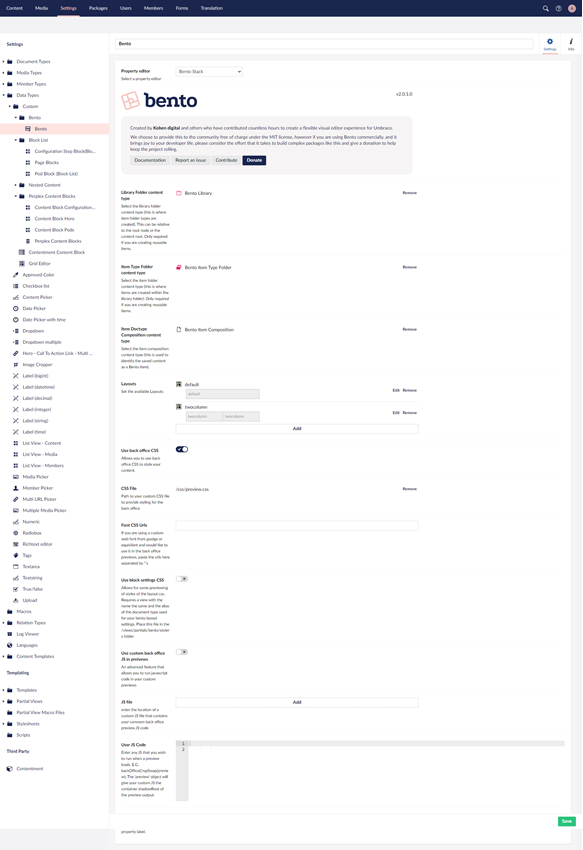
So that is all my document type set up done. Now I can start configuring the data type. I have created a data type based on Bento Stack.

Let us look at the main configuration options here. More information about the configuration options can be found here.
Now comes the big task of configuring layouts. Layouts can be a single cell spanning the entire width of the page or can be consist of a number of cells. To create a layout specify a layout name and an alias. With Bento, you can apply settings to each layout. For this, an element type can be set up and specified here. I have specified size of 1fr on my layout which spans the entire width.

The next step is to configure areas. I understand these as the cells or columns of the row. My layout contains a single column so I add an area called default. I have specified 1 column in 1 row. So my layout will be a single full-width layout that contains one row and one column. This is all based on CSS Layouts. I also need to choose my single-use item types and reusable library item types before I can save my data type and add it to my document type.

There is one last step I need to do before I can start rendering content. I need to go back to my Bento Item Composition element type and save it again. This creates all my view partial files for me in the folder Views/Partials/Bento. A file each is created for each single use item and library item. The files follow the naming convention <elementtye-or-documenttypealias>.cshtml. A file each is also created for backoffice preview. The files follow the naming convention <elementtye-or-documenttypealiasbackoffice>.cshtml.
Before we can render the editors we need to set up the Bento layout views. A partial view must be set up for each of the Bento layouts created in the Bento data type. The partial view must have the same name as the layout alias, default.cshtml in my example, and must reside in the Views/Partials/Bento/layout folder. My layout partial is shown below. Although you set up a layout in the back office using CSS Grid, the front end output is entirely up to you.
The layout partial has an StackItem object as the model. The object has an Areas property which is an IEnumerable<BentoArea>. The BentoArea has a Content property which gives me the IPublishedElement for the block. I loop through the areas and use a bit of naming convention to call a partial view of the same name as the content type alias of the IPublishedElement.
@inherits Umbraco.Web.Mvc.UmbracoViewPage<Bento.Core.Models.StackItem>


@foreach (var area in Model.Areas.Where(x => x.Content != null))
{
    @Html.Partial($"~/Views/Partials/Bento/{area.Content.ContentType.Alias}.cshtml", area.Content)
}
My partial view for the block gets an IPublishedElement as the Model. This is castable to the Models Builder model. Since I have both Single Use Items and Reusable Library Items configured I need to create 2 separate partial views. The files have already been created as explained above. So I add the following code to both BentoHero.cshtml and BentoHeroLibraryItem.cshtml.
@inherits Umbraco.Web.Mvc.UmbracoViewPage<BentoHero>
<header class="masthead" style="background-image:url('@Model.Image.Url')">
    <div class="container">
        <div class="masthead-subheading">@Model.PreHeading</div>
        <div class="masthead-heading text-uppercase">@Model.Heading</div>
        <a class="btn btn-primary btn-xl text-uppercase js-scroll-trigger" target="@Model.CallToActionLink.Target" href="@Model.CallToActionLink.Url">@Model.CallToActionLink.Name</a>
    </div>
</header>
Creating backoffice previews follows the same process. I am going for a backoffice rendering which is different from the website, so I add the following code to the partial views BentoHeroBackOffice.cshtml and BentoHeroLibraryItemBackOffice.cshtml.
@inherits Umbraco.Web.Mvc.UmbracoViewPage<BentoHeroLibraryItem>
<div class="customblock">
    <h2>@Model.Heading</h2>
    <p>@Model.PreHeading</p>
</div>
Bento Editor can be a very good alternative if you do not wish to use the Grid Layout.
Understanding the concepts behind asynchronous messaging
This article discusses some of the misconceptions about REST, and what is not REST and presents you with the facts.